
Category: Blog
How to protect your NV investment
A quality night vision device like one of our PVS 14s or a dual tube set like a Katana, MH1, ARNVG, etc. is going to stand up to a lot of use and a fair amount of abuse..
That being said, quality night vision is expensive. Yet for all the times we have heard “it’s three thousand dollars!” on a PVS-14 we have also seen as many examples of people just literally abusing the systems.
There remains a few simple common sense things you can- and should- do to protect your night vision investment.
#1. Remove the battery(s) every single time your done for the night. Period, end of statement. We mention this in the “quick user guide” customers are sent with their tracking email on NV orders, in the paperwork shipped with NV devices as well as every time a customer asks about NV on the phone. I have been “challenged” online once about this, with someone stating that “you don’t know my operational parameters.” Well, no, but everyone over the age of FIVE knows when it’s starting to get dark and since night vision is only useful at night, well let’s say you will know a little ahead of it’s need and since it takes all of about 5 to 10 seconds to install a battery in a PVS14, I don’t see this as a reason to RISK damaging your unit.
Also, anyone who has worked with gear in the field, been in the military or just done an extensive amount of training over the years, knows that there are certain things you do at certain times- i.e, pack any gear away that you needed at night (sleeping bag, etc.) before first light. This is just normal SOPs stuff for living in the field. At a defensive position or retreat, the same type of SOPs apply.
So how exactly do people screw this up??? I have a theory. It’s usually people that don’t work with their NODs regularly, most likely haven’t trained with them (just like your gun, you need training with your NODs). Therefore they don’t realize the need to remove it.
“But Robert, is this really a big deal?”

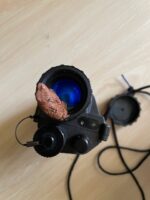
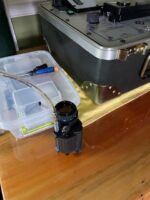
This is one of the most recent (and bad) examples of what a battery left in a NV device will do. In this case the corrosion was so bad as to stop the unit from working. We have seen customers send some units where the damage was so bad it required a new PVS14 housing ($700. or more). Note- no company covers this kind of customer negligence in their warranty and neither do we. This particular one was so bad we weren’t sure we were going to get the battery cap off to begin with.
Some of these customer negligence issues can be cleaned up and fixed, some require the change out of the housing. All because the battery wasn’t removed.
Battery out, every single time, no exceptions. Get into that habit and your grandkids will be using your NODs. Be lazy and negligent and your unit will stop functioning- maybe even at a time you really need it!
#2. Cover your lenses when done.
You don’t need “iris” or refocusing devices, the standard black “pinhole” aka “daylight” cover for the objective (front) lens is fine. We ship units with throwaway black plastic caps covering the eyepiece (rear) lens also. Keep them for storing the unit as well.
Lenses aren’t cheap, especially quality lenses like we use. An LIF and a sacrificial window is helpful to avoid bumps and scratches in the field.
3. Tether your unit. When mounting to a helmet, Crye nightcap, etc. be sure to add some sort of tether to your device from the helmet. This could be a commercially produced tether or something you made yourself as simple as a piece of cord attached to the unit tied to the helmet mount.
This is how one of our rental gear PVS14s was returned by a student a few years ago, well, he put the daylight cover on to hide the mud… Now when we set students up with rental gear, we tie the unit to the mount after it’s installed. So technically this shouldn’t have happened, but the student untied it, then later dropped it and somehow just forgot to mention it… It cleaned up fine but goes to both #2 and #3 here. Had we been in a region with rocks instead of mud, this could have damaged the objective (front) lens and necessitated a $300. plus repair. Tether.
You invested money in your night vision device, be smart with it, do these things mentioned above to protect your investment.
A quick look at tube cosmetics
If you’re new to night vision, it’s important to realize every single night vision tube is different. No matter if the tube goes in a PVS-14 monocular, a Katana, ARNVG, MH-1, or other dual tube set, every single tube is at least slightly different from the next tube.
Real night vision tubes are an analog product. Not a digital product like a flat screen TV. In other words, for example, you go to a store, buy a new TV and you really like that TV. You go back the next day to the same store and buy the same digital TV model and it’s going to be practically identical. Analog night vision tubes are not like that. Each has slightly different characteristics or specifications as to how that particular tube tested out at the factory. This is reflected in the metrics of Signal to Noise Ratio, Center Resolution, EBI, Photocathode Response, Halo, etc.
Also, from one tube to the next, the cosmetics of the tube are different.
What do we mean by “cosmetics?” No, we aren’t talking about Maybelline…
Cosmetics as we use the term in regards to night vision tubes is used to describe how the tube itself looks. Specifically referring to small spots that often happen during the manufacturing process of the tube. While the term “blems” is often used in place of “spots”, your NV data sheet calls them spots. Don’t worry, we think it’s nit picky to worry about terminology too much also.
Spots are classified by the tube manufacturers (Elbit, L3, Photonis) by the size of the spot. Anything LESS than .003 in size is not charted on the data sheet and the manufacturers consider these “pepper speck.” Pepper speck are teeny, tiny spots that are often not even seen at night in actual use of your NV. Pepper speck are NOT often seen in tube pictures that are used on the web to let customers see the cosmetics of a particular tube. Essentially, 99% of the industry says they don’t matter, “it’s pepper speck” is the same as saying “it’s nothing.” This is why you may obsess and stare at a tube pic online and not see these (cause they are so damn small!) yet in person staring at a white wall, you may see these. The data sheet for the unit will NOT mention pepper speck (refer again to the “it’s nothing” industry comment above).
We often get asked about pepper speck, as we try our best to describe even these minute, barely visible cosmetics when we list a unit. New people often mistake actual “spots” (remember .003 and larger only for “spots”) and pepper speck. Others unknowingly assume “pepper speck” is some sinister thing that will hurt their tube. The reality is that pepper speck doesn’t hurt your tube any more than a common black spot that comes from the factory that way (different from a large spot that develops later- i.e, from being dropped, IR burn, etc.). The tube manufacturers wouldn’t give you a warranty on these if they felt it was a problem. They are just cosmetic flaws.
Should you worry about pepper speck? No. It’s just a common cosmetic issue and to be honest the smallest of them all. Here at JRH Enterprises any device we build here, we note EVERY cosmetic issue seen in the tube, whether via the Hoffman test set, or through the naked eye. This is why you see the most comprehensive description of the tube cosmetics from us, noting even pepper speck and other small cosmetic issues that the tube manufacturers do not mention- like small lines, small shadow areas and edge distortion
To be clear for the new folks, NONE of these cosmetic issues mentioned will affect the longevity of your tube and only very large (.012-.015) size spots will affect your view through your tube. That being said, ideally you want to seek out a tube that is as cosmetically clean as you possibly can. In the descriptions we use terms like “beautiful tube” when the data sheet shows clean (no spots) and the most we find is maybe 1 or 2 small pepper speck. “Very clean” is the next indicator down our list and that in general means no large spots and just a few pepper speck, or you might see “1 spot, otherwise very clean” which would denote the tube has one tube but other than that would have been listed as “beautiful.” While these terms “beautiful, very clean, etc” are subjective, we have been told by feedback from customers that our grading system like this offers a very accurate assessment of tube cosmetics.
We feel this, along with the data sheet info, along with the tube pic gives customers more information about cosmetics than seen elsewhere, allowing you a very well informed decision.
As always, if you have any questions, we are here answering phones and emails 6 days a week. 912.375.1480 robert@jrhenterprises.com
Why Purging a PVS14 is Important
When properly assembling a night vision device, whether it’s a PVS-14 or a dual tube set, a proper pressure test and nitrogen purge is very important.
First, a vacuum is pulled on the device. A gauge on the purge set is pumped up and left in place for a short period of time. During this time, there should be no leakage- as seen on the set by the needle falling rapidly. This is another step in confirming proper assembly and that the components are up to the task.
Then, nitrogen is then flushed into the night vision system. This is done to protect the optics from getting foggy in high humidity situations- similar to how your car windshield will fog up on the inside during inclement weather.
Another advantage of proper nitrogen purging is that if there remains any “debris in field” aka small trash inside the unit from assembly, the pressure of the purge will often show this. Pepper speck, actual spots, small lines in the tube and other tube cosmetic issues won’t move when purged, however, debris usually will. This helps the technician spot any potential problems and then the unit is disassembled and cleaned again and the whole process starts over purging the unit again. We nitrogen purge every night vision device assembled here at JRH Enterprises.
A common question regarding nitrogen purging is do you have to do it regularly? Unless the unit is damaged, disassembled, etc. purging regularly isn’t necessary. If you start to see fogging after the unit is dropped or mishandled, then certainly it’s time to get it purged again.
On any NV units produced by JRH Enterprises (will have a data plate on the side of the device similar to the ones in the picture below), we are happy to purge the unit for you again. This is free of charge (customer pays shipping). Email us with your system number/serial number on the side of the unit (see pic).
How to pick out a PVS14
Below is a quick look at how to pick out a PVS14 for new users. Sometimes the “research” people do on night vision literally can just lead them in circles. Worse yet they get advice from people who’s circumstances or uses may not be similar to yours.
“What do the numbers and pictures mean?”
Since every single night vision tube is different, there are natural variations in tube performance and cosmetics from one tube to another. One tube may have several black spots, while another may be cosmetically clean. One tube may have low EBI, while another may have a higher Signal to Noise Ratio but also a slightly higher EBI. Which to choose?
FOM is a term you will hear a lot about. It stands for Figure of Merit. It is the Signal to Noise Ratio specification multiplied by the Center Resolution specification of an individual tube.
Signal to Noise Ratio X Center Resolution= FOM
For example: 30 x 72 = 2160 FOM
A tube with a Signal to Noise Ratio of 30 and a Center Resolution of 72 would have a figure of merit of 2,160 and all other specifications aside, would perform more than adequately for 99% of the lighting conditions most people will face.
A higher the FOM level is, in general, an indication of a greater level of performance you can expect to get out of your tube. This means greater light gathering capability which helps in extreme low light situations.
At this point I would remind you that we are never more than a phone call or an email away. And even after you read this, or “just aren’t sure” that what you are looking at is best for YOU, just give us a quick call. You are under no obligation to buy. We do this every day. Avail yourself of 33 years of experience! Call us at 912.375.1480 or email us at robert@jrhenterprises.com